This method is slightly different but may be easier to understand how it works. You might like to view it at full screen in maximum resolution to be able to see it more clearly.
Friday, August 5, 2011
Tuesday, August 2, 2011
Fast Adjustable Vignette - Gimp Tutorial
I sometimes want to put an artificial vignette on photos that I have taken, but I could not find a fast way of doing this until while still being able to adjust he parameters quickly... until now.
Very brief instructions:
Detailed instructions:


Very brief instructions:
- Create a copy layer with a mask
- Use the radial blend tool on the mask from centre of interest point to farthest corner of photo
- set top layer to be subtract (or maybe multiply)
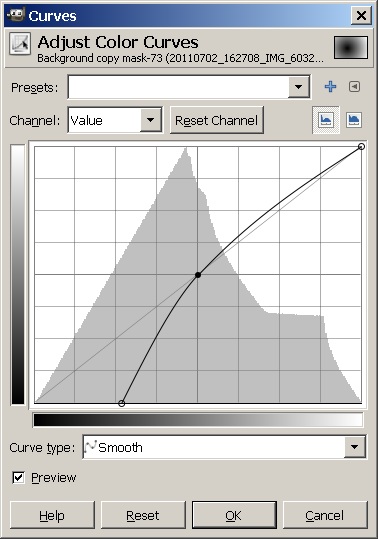
- Use curves on the mask to make sure interest point is not vignetted at all and adjust curve for pleasing vignette effect.
- You can double the power of the efect by simply making a copy of the vignetted layer.
Detailed instructions:


- Select the blend tool and make sure that the "Shape" is set to "Radial"

- Making sure that the mask is selected drag the tool from the centre of the photos important part to the furthest corner of the photo.


- Change the Top layer "Mode" to "Subtract", you can also try some of the other options here for intersting effects such as "Burn"

- To modify the vignette:
- Use the curves tool to specify the area excluded from the vignette and also the rate that the vignette is graduated.
- If you can't get the effect powerful enough for your liking (more noticable with other effects like multiply) then you can create a duplicate of the vignetting layer and it will double the power of the effect


 |
| Before |
 | ||
| After |
Sunday, November 28, 2010
Macro extension tube effects
I recently purchased the kenko extension tube set. You can find a review of them here (http://www.the-digital-picture.com/reviews/kenko-extension-tube-set-review.aspx).
One of the problems that I had was that I was unsure what size things I could photograph with the combination of rings and lenses. So I decided to photograph a ruler with different combinations so I would know. I have shared my results here so everyone can benefit.
Equipment used:
Canon EOS 5D Mark II
Canon 50mm f1.4 (50)
Canon 70-200mm f4 (70-200)
Canon 17-40mm f4 (17-40)
Kenko Extension Tube set 12mm, 20mm, 36mm (12, 20, 36)
In this context "field of view" represents the distance from the left side of the frame to the right side of the frame that was in focus. For instance the following photo shows, what I am calling, 35mm field of view

I tested the 17-40mm at 17mm but the chromatic aberation was so bad that I would call it unusable.
So, what about some practical examples:


Other fundamental macro notes
The camera becomes a very significant shadow when dealing so close to your target. I dislike the look of direct flash mounted on the hotshoe of a camera. Instead consider:
Note: I receive no commission and have no affiliation with any camera equipment dealers.
I purchase my set of tubes, flash cord and diffuser by searching on ebay and then picking the cheapest ones that would fit my camera.
Useful External macro links
http://nocroppingzone.blogspot.com/
If you have any questions feel free to ask.
One of the problems that I had was that I was unsure what size things I could photograph with the combination of rings and lenses. So I decided to photograph a ruler with different combinations so I would know. I have shared my results here so everyone can benefit.
Equipment used:
Canon EOS 5D Mark II
Canon 50mm f1.4 (50)
Canon 70-200mm f4 (70-200)
Canon 17-40mm f4 (17-40)
Kenko Extension Tube set 12mm, 20mm, 36mm (12, 20, 36)
In this context "field of view" represents the distance from the left side of the frame to the right side of the frame that was in focus. For instance the following photo shows, what I am calling, 35mm field of view

| Lens | Tubes | Lens Focal Length Setting | Minimum Focus field of view | Infinity Focus field of view | Notes |
|---|---|---|---|---|---|
| 50 | none | 50mm | 250mm | - | |
| 50 | 12 | 50mm | 95mm | 155mm | |
| 50 | 12+20 | 50mm | 50mm | 60mm | |
| 50 | 12+36 | 50mm | 34mm | 39mm | |
| 50 | 20+36 | 50mm | 30mm | 35mm | |
| 50 | 12+20+36 | 50mm | 25mm | 29mm | |
| 70-200 | none | 200mm | 155mm | - | |
| 70-200 | 12+20+36 | 200mm | 60mm | 110mm | very long lens, camera shake is significant |
| 70-200 | 12+20+36 | 70mm | 40mm | 40mm | very long lens, camera shake is significant |
| 17-40 | 12+20+36 | 40mm | 17mm | 22mm | at minimum focus, end of lens is less than 10mm away from target |
I tested the 17-40mm at 17mm but the chromatic aberation was so bad that I would call it unusable.
So, what about some practical examples:

matchbox mini (taken with 12+20+36 tubes, 50mm f1.4 at f22 and focus set to minimum)

Australian $2 coin (taken with 12+20+36 tubes, 50mm f1.4 at f22 and focus set to infinity)

Australian $2 coin (taken with 12+20+36 tubes, 50mm f1.4 at f22 and focus set to minimum)

Australian $2 coin (taken with 12+20+36 tubes, 50mm f1.4 at f1.4 and focus set to infinity). Lack of depth of field is your enemy in the world of macro.

very small needle (taken with 12+20+36 tubes, 50mm f1.4 at f22 and focus set to infinity)
Other fundamental macro notes
The camera becomes a very significant shadow when dealing so close to your target. I dislike the look of direct flash mounted on the hotshoe of a camera. Instead consider:
- Firing the flash off at an angle to bounce off a white surface. This could even be a piece of white paper that you are holding if you are strong enought to hold your camera in one hand.
- Purchasing a flash cord that conencts to the shoe to enable you to place/hold the flash wherever you want. I bought a 3.6m coiled one and I am very happy with the distance. I was worried that the length would get in the way but I have not found this to be the case.
- Purchasing a diffuser of some kind for the flash.
Note: I receive no commission and have no affiliation with any camera equipment dealers.
I purchase my set of tubes, flash cord and diffuser by searching on ebay and then picking the cheapest ones that would fit my camera.
Useful External macro links
http://nocroppingzone.blogspot.com/
If you have any questions feel free to ask.
Subscribe to:
Posts (Atom)