This method is slightly different but may be easier to understand how it works. You might like to view it at full screen in maximum resolution to be able to see it more clearly.
Friday, August 5, 2011
Tuesday, August 2, 2011
Fast Adjustable Vignette - Gimp Tutorial
I sometimes want to put an artificial vignette on photos that I have taken, but I could not find a fast way of doing this until while still being able to adjust he parameters quickly... until now.
Very brief instructions:
Detailed instructions:


Very brief instructions:
- Create a copy layer with a mask
- Use the radial blend tool on the mask from centre of interest point to farthest corner of photo
- set top layer to be subtract (or maybe multiply)
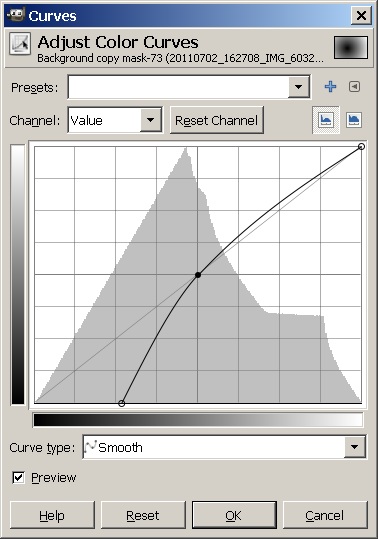
- Use curves on the mask to make sure interest point is not vignetted at all and adjust curve for pleasing vignette effect.
- You can double the power of the efect by simply making a copy of the vignetted layer.
Detailed instructions:


- Select the blend tool and make sure that the "Shape" is set to "Radial"

- Making sure that the mask is selected drag the tool from the centre of the photos important part to the furthest corner of the photo.


- Change the Top layer "Mode" to "Subtract", you can also try some of the other options here for intersting effects such as "Burn"

- To modify the vignette:
- Use the curves tool to specify the area excluded from the vignette and also the rate that the vignette is graduated.
- If you can't get the effect powerful enough for your liking (more noticable with other effects like multiply) then you can create a duplicate of the vignetting layer and it will double the power of the effect


 |
| Before |
 | ||
| After |
Subscribe to:
Posts (Atom)